I have been quite inspired by the beautiful autumn colours lately. I have been going through my collection of naturally dyed yarns and I’m determined to use them in my next project which is a traditional Scandinavian rya (ryijy) rug or a wall hanging. But I noticed that I didn’t have enough of orange and yellow colours that I wanted. Luckily I always keep a jar full of onion skins in my kitchen cupboard. Don’t we all? I always save up all the onion skins we use in cooking. So I did some dyeing with onion skins.
This time I used yellow onion skins. I have made a blog post about the process of dyeing wool yarn with onion skins here. I used the same exact method, so I won’t repeat it here. I have also written about red onion skins which give a surprising, but beautiful colour, you can read about it here. And I have also written about dyeing cotton fabric with onion skins which is slightly different, you can read about it here and here. It always surprises me how different materials take the colour differently. A very fine merino wool gave a very strong orange and more coarse wool more of a mustard yellow. Both are beautiful colours. The greens I got with dyeing gray yarn. Basic color theory blue (or grey in this) + yellow = green. I find it fun to dye yarns that already have a base colour because you can get surprising results. I wrote my bachelor theses last spring about natural dyeing and I came across with a scientific article where they came to a conclusion that pomegranate is one of the best ingredients in natural dyeing to dye with out mordanting. Pomegranate peel has a lot of natural tannin that helps the colours to fix. I really hope that I would remember if I use mordanted yarn or not with this, but the truth is that I really don’t. This was back in the June and it’s October now, I really should have made notes. This is partly what this blog is for me. Notes that I can go back to when I want to remember how I did something. This was a funny result. I had no idea what material this yarn was, but I think it was a mix of wool and acrylic or something similar. The manmade fibers didn’t take the colour and actually it looks nice!
I have been a bit late in the game for natural dyeing this year. Here in Finland beginning of June is definitely the best time for natural dyeing, thats when you get the best colours. I did some natural dyeing with lupines years ago and I got beautiful almost lime green colour. This year was my first time dyeing with lupine flowers and my goal was to get blue. This blog is called The Easy Blues, but ironically the blues are definitely not easy in the natural dyeing world. With lupine the blue colour is in the flowers, but the colour is very sensitive to heath so you need to keep that in mind when dyeing with them.
Lupine is not a native plant to Europe and in Finland in resent years we have been trying to get rid of it. But you can still see roadsides full of it. Lupine is great at spreading around and it’s not good for native plants who are having a hard time growing with them. So harvesting them and stopping them from spreading the seeds is good for the environment. Still Lupine is an excellent dyeing plant. The stalk and the leaves have yellow colours. If you dye with the whole plant normally you get green colours. Trying to get the blues that’s a different story. As you can see I got beautiful turquoise colour, but I was not lucky with the complite blue this year. I think its because I was doing the dyeing at our summer cottage and forgot my digital thermometer at the city, so I was just guessing the temperatures and I think I went too hot.
For the yellow yarn I used only the stems and leaves. I had pre mordanted the yarn with alum. I have written a blog post where I go through the whole dyeing process and you can read all about it here. For the green (which I don’t think is captured the right way in this photo) I used the flowers and a little bit of stem. It’s like basic colour theory more flowers (blue) means more green and more stems is yellow.
Now for the blue (which again is more turquoise in real life). I read this blog post from Tetri Design (all in Finnish). In the blog post Anna-Karoliina Tetri gives good instructions for getting really bright blues. She also highlights the fact that you can’t “boil” the colour out of the flowers because the heath will destroy the pigment. Basically you put the flowers and water in a pot and ad the premordanted yarn TOGETHER with the flowers. She has tried two different ways. Lifting the temperature to 80 degrees celsius and keeping it for 45 minutes or lifting the temperature for 45 degrees celsius and keeping the temperature for 2 hours. After that she lets the yarns stay with the flowers in the dye bath for at least 15 hours. She said that both methods resulted in similar results, the lower temperature gave slightly lighter and more blue results. The higher temperature was darker but slightly more green, which makes sense if the heath destroys the blue pigment. I think it a good idea to use a grey coloured yarns for darker blues. I have experimented with that before as well.
I tried the 45 degrees instructions, but as I said I forgot my thermometer, so I have no idea what the actual temperature was. And that’s why I think my blue has green in it although its a beautiful colour! I’m not complaining at all. With natural dyes you never know what you will get.
You do need fresh flowers because the colour will disappear also from dried flowers or withered flowers. This could also be why I got turquoise, because between picking the flowers and starting the dyeing process the family needed to cook lunch and eat it too. So I guess the flowers where not as fresh as they could have been.
The key was to bye the yarn with the flower in very low temperatures.I left the yarns to the dye bath overnight and rinsed them in the morning.I managed to match the colour to the shorts I was wearing!
The surroundings (walking distance) of our summer cottage actually had surprisingly little lupine compared to the previous years so I didn’t really have material to try again with the thermometer. This is a positive problem for the environment! I might try again next year. I’m interested to know how well this colour will last. Does anyone have any experience? I still have woolen socks that I knitted from the lime green lupine yarn I dyed in 2014 and they are looking good. Has anyone gotten really amazing blues out of lupines? Do you have lupines in your parts of the world?
I did some natural dyeing on cotton with cochineal. For those of you who don’t know cochineal is a dried insect from South America . It’s been used for getting purple colour around the world for centuries, I believe first by the Mayans and the Aztecs. It was very popular before synthetic dyes were invented. I like to use the whole ones (not the powder) because it’s easier to clean. I had premordanted the fabric with taro root powder and alum, you can read about it here.
I have done bundle dyeing before with cochineal on cotton, but never full cochineal dye. I have dyed wool yarn and I have written a blog post about it, you can read it here. Last time the colour was a lot more pink, I think I might have used cream of tartar which I have read might affect the colour. I did one mistake with trying to dye too much of fabric at the same time with a “small pot” (10 litres). The fabric should always have enough space to move around so the result will be even. That’s why I like using shibori techniques, where it doesn’t matter if the result is even or not. Wool yarn is much easier to dye evenly in my opinion. Leena at Riihivilla (where I buy my cochineal) has written an amazingly detailed post about cochineal both in Finnish and in English that I recommend for more information.
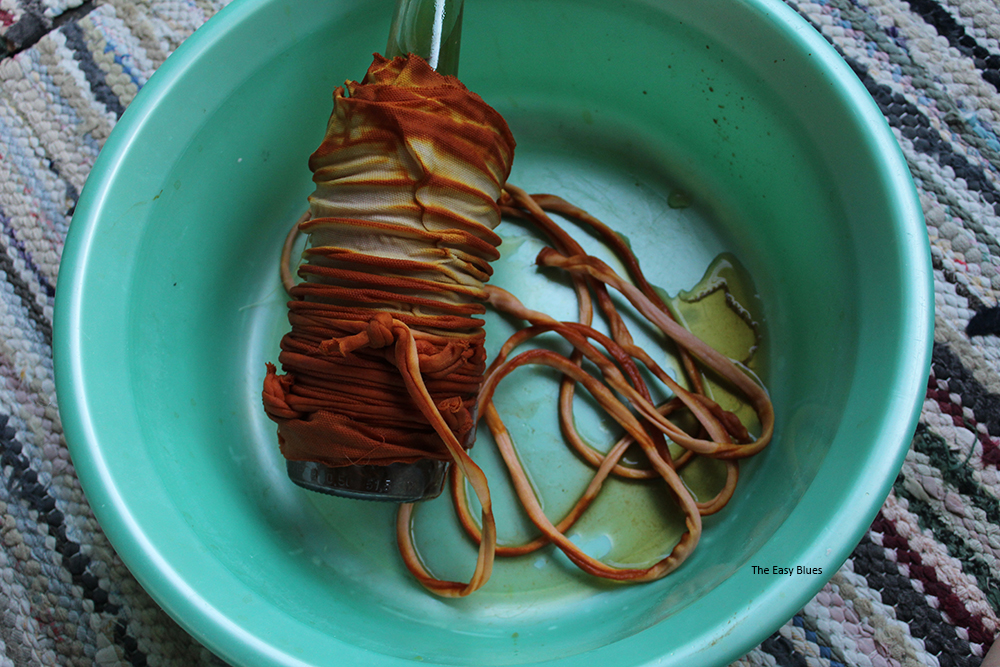
This shibori wrapped around a bottle turned out nice! I have used the same technique (arashi?) with onion skin dye here, where I talk a little bit more about it. This time it worked much better with much lighter fabric.
Dyeing with red onion skins blows my mind every time. How do these red skins turn in to yellow/green colours1? I have dyed wool yarn before with red onion skins and got an amazing strong colour. This time the colour was a bit lighter, but I think that really depends on the material. The lace I dyed turned out much stronger and this old sheet fabric that I have always gives lighter colours.
I mordanted my fabrics before hand with taro root powder and alum. You can read about it here. The dyeing process doesn’t differ from dyeing wool yarn or from dyeing with normal onion skins. I have written a good blog post about that here.
I came across this post about painting with milk and dyeing with tea by Rebecca Desnos. She has really good instructions on how to do that so I’m not going into that with this post. But this was fun and simple! As a future craft teacher I think this would be a nice technique to do with kids. And with the Covid 19 forcing kids to do home schooling (hopefully we are done with that in Finland), I think its an easy technique to do at home. You don’t need anything expensive just, cotton fabric, any milk (vegetable or animal), tea, and maybe a brush.
I used cows milk, but any milk will do. I found challenging that the milk would start spreading easily. Broad general patterns are easier to do.
I used some horrible old black tea I found in the cupboard. I tried green tea as well and it worked just as well, just a bit lighter colour.
I also dyed some of the fabric I had mordanted with taro root powder.
I really like this technique. It was fun and different and creative. It also got me interested in mordanting with milk. I have Rececca Desnos’s book Botanical Colour in your Fingertips coming on the post.
I did some pine cone dyeing this week. There are over 100 different species of pines in the world. In Finland we have just one naturally growing one (Pinus sylvestris). This was my first time trying out dyeing with any kind of cones, but reading about it, I feel that most cones act the same. They give brownish/pinkish/reddish tones.
I found a lot of information about dyeing with spruce cones, but not so much about dyeing with pine cones. I figured they cant be that different. Most instructions say that the cones from last year that have been laying under the snow the whole winter give the best colour. Well thanks to global warming last winter was the first one in my lifetime that we did not have snow at all in Helsinki. But anyways I thought how on earth I will know in August which ones are old and which ones are new?
I let the cones soak in water for one day and then started cutting them to pieces. I think this was a good idea as they got a lot softer. I also noticed that some of them where a lot lighter and others a lot heavier and sank at the bottom. Others where mushy and brown and others hard and red in the middle.
I found an interesting PDF of an old Finnish dyeing book from 1919. In it Alina Hellen says about spruce cones that: “You will get grayish red from them. The cones are collected during spring and summer. Preferably they should be the ones that have fallen out of the trees last year and have been laying over winter in wet places and because of that they have stayed hard and smooth. They should be dark brown/reddish and juicy from the inside.” She was talking about the spruce cones but I used this as my guide line and only used the ones that had red in the middle. I think it makes sense that that’s where the dye is.
Alina Hellen, 1919, Kotivärjäyskirja; Neuvoja kotivärjäykseen kasviaineilla. Suomen käsityön ystävät. KVS:n Käsiteollisuuskirjasto N:o 13
Cutting the cones into pieces was a lot of hard work and I should have had proper tools for this (like garden scissors). My thumps hurt a lot the next two days. This was definitely one of the most labor intense dyeing things I have done.
I boiled the cones for almost four hours. Normally I only do two hours, but hard stuff like cones need a little more time. The smell is so good by the way! I wish someone would make a boiling wood perfume. Looking back I probably should have had a bit lower temperature. I lost quite a bit of dye. And I could have left the cones to soak in the dye bath until the dye was cold. But I wanted to start the dyeing process.
I invested and finally bought some muslin cloth. It really is a good idea to use it to do the sieving. All this small mush that goes through a normal sieve could make the dye result uneven. I also cleaned the pot at this point.
The dye itself was a dark brown with a reddish tint.
I dyed my cotton fabric for one hour and let it cool in the pot. The next day I used the same dye for a second time for another patch.
These are colors that I got. The top one was crumbled. The darkest bottom one was a different fabric.
The end results where beige light brown colours. The bottom fabric was a different fabrics. The rest where an old cotton sheet. I think the bottom one is mostly cotton, but I think its mixed with some kind of synthetic fiber. I was surprised how well it took the colour.
The interesting thing was that there was no difference between the mordanted and unmordanted fabrics. I’m guessing that the cones have natures own tannin and don’t really need mordanting.
All and all beautiful colours, but a lot of work. I do think there might be an easier way of getting lovely browns…. In 2014 I dyed with juniper bark and I think that was a lot easier. You can read about it here. I have also dyed with walnut hulls, although that was a long one month soaking. You can read about it here.
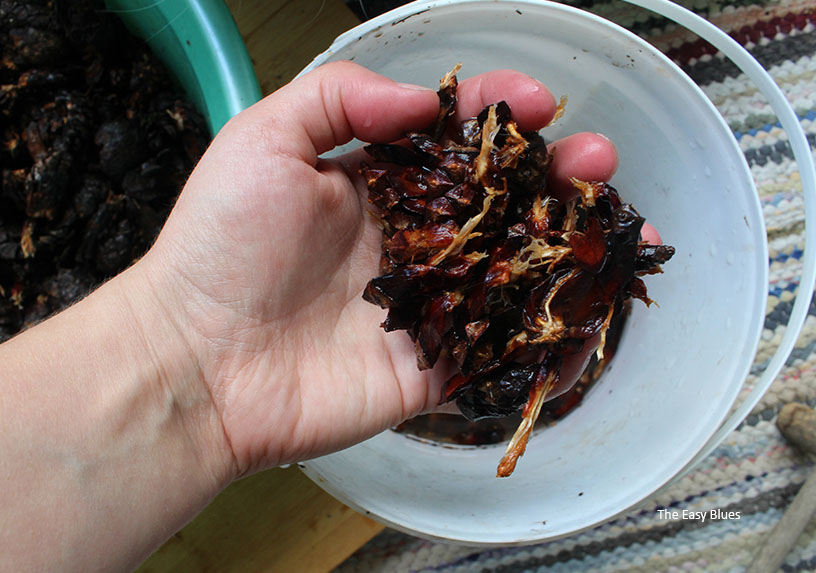
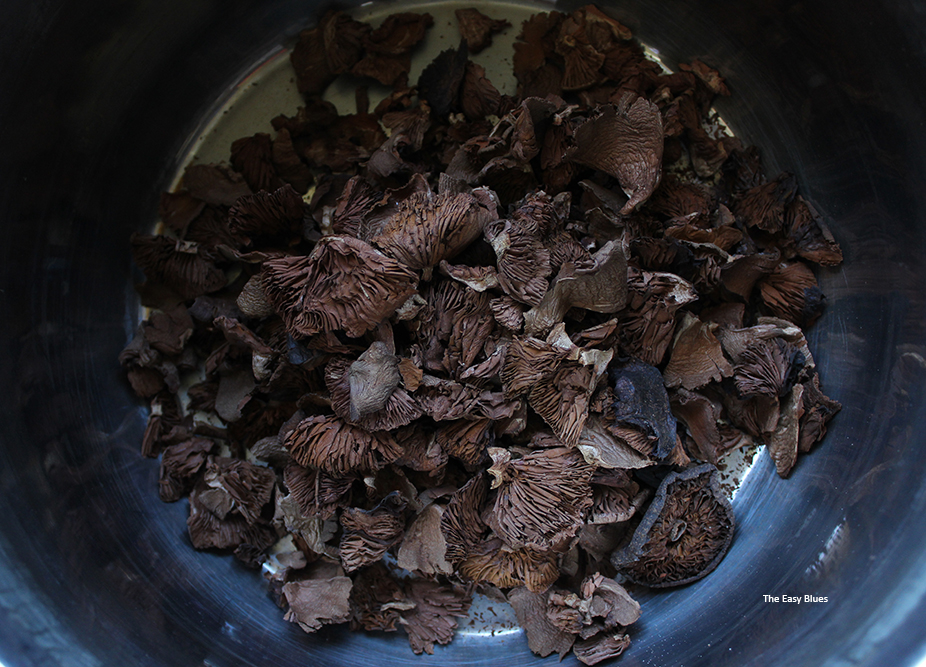
I did some mushroom dyeing with surprise webcap caps this week. I was very surprised (no bun intended) by them. I was expecting darker more orange toned autumn colours. According to Leena at the Riihivilla younger mushrooms have more orange colours and older mushrooms have more red colours, but that the colours can differ a lot depending on where they have grown etc. Also a funny thing is that the caps have red colour and the stems yellow colour so you can have two different colours from them! This time I only used the caps.
Six years ago I actually collected the mushrooms myself and got lovely orange colour with wool yarn. You can read that post here. Keep in mind that these mushrooms are poisonous, not edible! This time I used some mushrooms I bought from Riihivilla online shop a year ago. Maybe the age has something to do with these pinks? Or the tara powder I used to mordant my cotton? I really don’t know.
I alway, always have different pots and utensils for dyeing and cooking, but especially for these mushrooms! I added the mushrooms at the bottom of the pot and added a little pit of water, not full. I let the mushrooms simmer for an hour (about 80-90 degrees celsius). Then I sifted the mushrooms away and added more water to the dye.
I put the mushrooms inside old pantyhose, so I could put them in the dye bath with the fabric. I mordanted my cotton sheet with tara powder and alum. The post I wrote about it is here.
I simmered the fabric in the dye bath for about two hours in 80-90 degrees celsius (I don’t measure temperatures so much these day). I let the fabric cool in the pot and then rinsed the fabric. I read afterwards that its good to add some vinegar to the rinsing water when dyeing with these mushrooms so the colour will last better.
I used some iron modifier to some of the fabrics and they turned violet! The beige one is from when I dyed a new fabric in the same dye bath, it came out light pink and when I added it in iron water it turned beige. Such different results!
I “made” the iron water by putting some rusty screws in a glass jar with water and vinegar. I have also done some rust dyeing experiments so I used the rinsing water from them.
I also did some shibori spiral experiments.
The swirl worked fine, but I really need to use a thinner fabric when making this kind of folded shibori. I might just keep adding some other dye experiment on it. All and all dyeing with surprise webcaps was very interesting and not at all what I expected. But that’s the nature of natural dyes. You never know what you get!
I have been saving up onion skins the whole spring and summer and finally I had enough to do an onion skin dye. Onion skins were one of the very first things I tried natural dyeing with. They are so easy and you get a very strong, lasting and vibrant colours. They don’t necessarily need an mordant and at least for me they work every time! And they are easy material to collect, very beginner friendly. I’m obsessed with mordanting so I mordanted my cotton with tara powder and alum, there is a post about it here. There is also an old post I wrote about dyeing wool yarn with onion skins here.
The new thing I’m interested in is shibori dyeing. I really don’t know much about it so I’m still learning. I think for some of the things I did use a bit too thick fabric. I bought this old sheet from the flea market and that’s what I have been using for all of my dyeing experiments. I used a you tube tutorial from Blueprint to do these shibori folds. I had to improvise a bit though.
Onion dyeing is very simple. You can pre soak the onion skins in cold water for anything from two hours to a day (or as long as you want). This time I skipped that step and just gently boiled the onion skins in my 10 litre pot for two hours and then filtered the skins away. I pre soaked the things I wanted to dye before adding them to the pot. Making sure they have enough room to move around in the pot.
I like to keep the temperature around 80-90 degrees celsius, it does not need to boil terribly. With wool yarns especially its good to keep an eye on the temperature as wool does not like to be boiled. Cotton of course is not so sensitive. After two hours I turn off the heath and let things cool down before I take them away from the dye. Then I rinse them with water until there is no more excess dye in the rinsing water.
The first photo below is my second try with the bottle twisting shibori (I believe it’s called arashi-shibori?). I tried to do just one fold because with my first try (second photo) there were way too many folds and the dye just didn’t go through. I’m learning that with this kind of shibori thinner fabrics work better. The third one is the folded one where I used some chopsticks and the last one is the hand sewed one.
The good thing about onion skin dye is that you can easily use the same dye bath multiple times. I usually always try to do at least two dyes with any natural dye. This time I did three and I probably could have done more.
I had to fill me bottle with water so it would not float in the dye bath. This bottle was also the only thing small enough to fit in to my dye bath. I think I got the shibori bug now and I need to try some more.
Six years ago I did two post on how to dye wool yarn with black beans. As I have moved into dyeing cotton fabric I thought I would write a little updated post. You can read here the part 1 and part 2. I basically I used exactly the same technique, the biggest difference was that because I was dyeing a cellulose fiber I mordanted with both tara powder and alum. There is a post I wrote about mordanting with tara powder here and with alum here.
I soaked a 450g bag of black beans in a 2 litre bucket of water for 12 hours. Then I strained the dye into a glass jar (I don’t think the glass jar is important though). I soaked the same beans in a new water for another 12 hours and strained the dye again to the glass jar.
THE FIRST DYE BATH
I did a basic triangle shibori fold and let it soak in the jar for 24 hours. Its good to put a plate or something underneath the jar if is not air thigh and its really full, mine did spill liquid out during the process.
The results do look darker here. After this I gave them a good rinse with water to get rid of all the excess dye. And then I let them dry. It’s good to remember that natural dyes do tend to fade a bit in the sunlight, and in my experience black bean dye is one of those. I always dry my materials inside to protected them from the sun.
I think the shibori worked out quite nicely!
Same dye bath, second dye
I’m sure this shibori has a name. Or maybe its tie dye? Leave a comment if you know. I did the same as last time. Let the bundle soak in the dye bath for 24 hours.
All and all I did three dyes in the same dye bath. Each time the results got a bit lighter. I have some black bean dyes from six years ago and the years have faded the colours a bit. Some natural dyes are like that, in my experience mainly vegetable dyes . That’s why I prefer a darker colour, so that the results last longer. I also did a little test with unmordanted fabric and it did work, not as well as mordanted fabric. My hypothesis is that the dye lasts time better when the fabric is mordanted, but I don’t have the evidence to support that yet.
There are many factors that play a role in what kind of colour you will get and I have not cracked all the secrets yet, but the main ones are:
BEANS: I have gotten very different results from different brands of beans grown in different parts of the world in different soils.
WATER: The pH-levels of your water effect a lot your dye results. If you want you can measure it with pH-indicator strips. Number 7 is the neutral pH level, pH less than 7 are acidic and solutions with a pH greater than 7 are basic or alkaline. You can change the pH to more acidic with vinegar, I use alum as an mordant which I believe is acidic as well so it all ready effects my results. Or if you wanna go more alkaline you could try baking soda. Or try using rainwater or spring water to get different results. It really is about experimenting.
FABRIC: This is an obvious one. The base colour of you fabric or yarn means a lot as well. In the past I have gotten really lovely dark blues with a yarn that was grey to begin with. Also the quality of the material, thin or thick etc. effects.
And in the end with natural dyes you just never know what you get.
I started experimenting with eco printing around three years ago. I don’t really do neat look-a-like prints of leaves. I think they are so pretty and I would like to do that at some point. At the moment I work with limited Finnish dyeing plants and a very short nordic summer so I make do what I have. More research is needed! I also kind of like the more abstract way my prints look, they feel more like me. This post is a kind of summary of some things I tried over the years. I write this mostly for myself as its handy to have a diary to come back to when I have forgotten how I have done something. But if somebody else finds this useful how nice would that be!
TECHNIQUE
Mordant the fabric. (Here is my previous post on mordanting cotton and other cellulose fibers.)
Lay fabric on an even surface.
Fill a half of the fabric with plants etc.
Fold the fabric in half
Roll the fabric tightly around a wooden stick
Twist strong yarn around the stick
Steam the rolls in a pot with little bit of water on the bottom around two hours (or use double layer steam pot). I have used rocks on the bottom so the rolls don´t lie in the water. I also make a diy steamer with putting some foil on top of the lid.
Open the rolls and remove the plants
If needed wash the fabric, dry and iron.
MATERIALS
You can use for example these things for dyeing (links to my previous posts):
Rusty items (nails, screws, pottle caps): Black or violet colour (The rust has natures own tannin that helps the colour to stick to the fabric.)
Rusty screws, black bean (that did not work in this) andmadder powder.
Pansy: violet or blue colour (The colour doesn’t last very long).
Above you can see my first ever experiments with eco printing, where I experimented with pansies and the colour did fade away quite quickly. Underneath birch leaves. Yellows are onion skins. I realized that it was better use quite a lot of plants to get the maximum colour.
I got to teach eco printing at a children’s summer cap in 2017 and they where so creative with it!
They really got some strong colour from the chochineal and the rusty screws!
Then we used the fabrics to sew pillows.
(I buy all the things I don’t collect myself from the Finnish Riihivilla online shop. Her blog also has so much good knowledge about natural dyeing both Finnish and in English)
HOW LONG DO ECO PRINTS LAST?
Some natural dyes like berries and red cabbage are fugitive they fade over time, like the pansies I tried. Also natural dyes fade a bit in sunlight, that’s why you should never dry them in sunlight. Mordanting is important factor in fibres keeping the colours.
Of course time will have its effects as well. This is a bag I dyed back in 2017 when I was experimenting eco printing for this children’s summer cap and then there is the same bag 3 years later in 2020. You can see that the bag has faded a bit.