DIY Christmas Decorations

I can’t believe that Christmas is so near now! Where did the time go? I had so many Christmas related plans and I only had time to do half of them. These Christmas decorations where among the few. Browsing around Pinterest I came across quite a few similar kind of decorations to, mostly made out of felt. I made mine out of cotton fabric and embroidered the pattern with a cotton yarn. It’s been years sense I’ve done any embroidery and I did feel a bit Jane Austin like. The whole proses was quite fun and I wish I would have had time for more. I wanted some very simple red and white decorations to make things more Christmassy around and they did.

IMG_6164_3

IMG_6168_4

IMG_6171_4

IMG_6170_4

IMG_6156_4

IMG_5812_4

I also hung some of the crochet snowflakes from last year to my bedroom window. I have hoped for white Christmas and looks like my wish will come true. The snow arrived yesterday and covered the ground, now it’s really beginning to look like Christmas. I wish you a lovely Christmas time, where ever you are in the world and however you are going to spend it. Hyvää Joulua!

DIY Scented Candles

IMG_5853_2

This was not the first time I’ve made candles, but this was the first time I did it by myself in my own home. For some reason I thought that making candles is difficult. It really isn’t! That said this experiment was not entirely successful. My life at the moment is filled with candles as through my job I work with them almost daily.  Naturally I have gain interest in the materials and the making of candles. I read this blog post in the Hello Natural blog and I thought that I’ll have to try to make scented candles myself. I’ve had these metallic muffin tins in my cupboard for years and I thought they would make lovely candles as I never use them in cooking anyway.

IMG_5739_3

Another reason I wanted to make candles was the fact that I have wanted to try out soy candles for a long time. I was curious to know are they any different from paraffin or stearin. I like the idea of all natural candles, so I ordered some soy wax online.

IMG_5774_2

I boiled some water in a pot and melted the wax in a separate bowl that I put inside the pot.

IMG_5967_2

If there is something I have learned about candles it is that it’s very important to have a right sized wick.  If the wick is too thin the flame will melt more wax than it can burn and the candle will drip. If the wick is too thick the flame is going to be too big and the candle will release smoke. The thickness of the wick should be chosen in relation to the size of the candle. The cotton wick that I chose was meant for 60-70mm wide candles. I also bought some metal wick taps for the wicks. I put a little bit of hot glue to the bottom of the wick tap a glued the wick to the muffin tin. I used wooden grill sticks to keep the wick straight.

IMG_5871_3

The blog post that I mentioned earlier was for chai scented candles and for the scent was used ordinary spices. I used cinnamon, ginger and cardamom.

IMG_5933_2

Now this is where I think I went wrong as I didn’t really manage to get the scent to work. Later on I read that the temperature of the wax is very important when you are adding scents. I did two separate tries. First time I didn’t think about the temperature at all and there were actually very nice smells floating around the kitchen, but the candle itself didn’t work. Then I read that you might end up burning the scents off if you use temperatures that are too hot. During my second try I was a bit scared of making the wax too hot and I think that the spices didn’t mix with the wax very well. I even added some extra spice to get a stronger scent. It didn’t really work though. What is the right temperature for this? I read that you should keep the wax under 80 °C I think mine was around 60 to 70 °C.

IMG_5779_2

After that I poured the wax to the containers. I also tried some glass baby food jars. During my second try I read that the containers should be warm so I put them in the oven for a little while before poring the wax in. I don’t know if it made any difference.

IMG_5786_2

And then I let the candles set and cool off.

IMG_5793_2

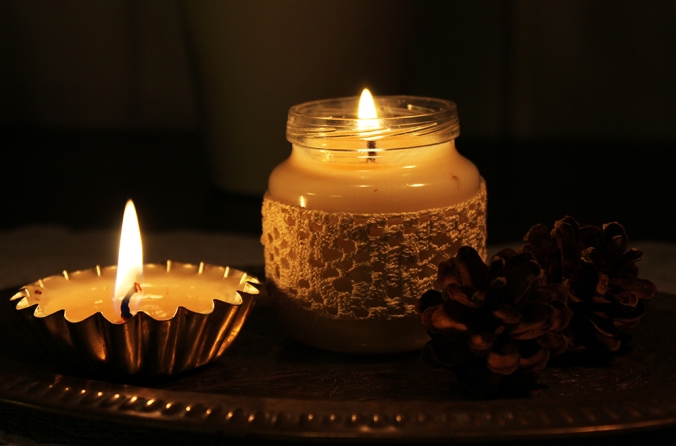
Here are the ready made candles. I also did two small paraffin candles. I used leftovers from a paraffin candle I’ve been burning lately. I melted the wax and added some spices. Because I like experimenting I wanted to test how soy wax and paraffin wax really act differently.

IMG_5807_2

I must say that the paraffin candle had a better and bigger flame (on the left) put it also burned a lot faster. The soy candle (on the right) lasted a lot longer. The melted wax acts also very differently. Paraffin wax is a petroleum by-product created when crude oil is refined into gasoline. Soy wax is made from soybeans. The paraffin wax sets and cools off a lot faster than soy wax. Soy wax is very buttery when melted and it’s quite soft even when it’s solid. Paraffin sets very quickly into plastic-like consistency. Makes total sense when you think about the origins of the two materials.

IMG_5830_2

IMG_5845_2

IMG_5834_2

IMG_5928_2

Although my my first experiment in the candle making was not completely successful, I really like the candles even without the scent. I might have a another try in the future, maybe with some essential oils. I don’t think I will have any candle shortage for a little while. Do you have any candle making tips for me?

DIY Christmas Wreath

It’s almost December, so now I can officially go nuts about Christmas. I’ve had so many Christmas related ideas for months. I had never done a Christmas wreath myself before but luckily my friend and flatmate Riikka had. We dedicated an evening for crafting a wreath for kitchen window, whilst listening Christmas songs, obviously . I’m very proud of our collaboration project. The wreath turned out so pretty!

IMG_5709_3

IMG_5677_3

IMG_5509_3

So how to make a Christmas wreath? First you need some fresh and springy willow branches that you start twisting around each other. Attach them together with wire.

IMG_5526_3

Then find the right size for the wreath and close the circle.

IMG_5543_3

Continue twisting more willow branches around the circle until the base is sturdy enough.

IMG_5574_3

We used a quite a wide arrange of different things to our wreath; spruce twigs , heather, thuja twigs and twigs that are either lingonberry or northern bilberry (I’m not sure). For decoration we added some rowan berries and pine cones.

IMG_5591_3

First you start making little bunches of twigs and securing them with wire.

IMG_5581_3

Then start attaching them to the willow base with wire. This is the phase where you get to be creative.

IMG_5579_3

Eetu was begin very helpful through the whole process. Such a curious cat, he also wanted to take part in this project.

IMG_5607_3

IMG_5611_3

IMG_5620_3

IMG_5627_3

IMG_5630_3

Finally we did some trimming and final touches. We also added some fairy lights. The wreath was very beautiful by itself, but because we were going to hang it to our kitchen window, which this time of year is most of the time pitch black, we needed some light.

IMG_5647_3

IMG_5650_3

Little by little it’s starting to look like Christmas here. Thanks for Riikka for teaching me how to do a Christmas wreath and helping with the photos.

Let it snow: crochet snowflakes

I started this project a year ago in November. I love Christmas and I usually start thinking about it during November. Last year it occurred to me that in my family we have used the same Christmas tree decorations for over 20 years. I felt that change would be good and got really excited about crocheting snowflakes. I started in November and continued crocheting until Christmas so that I would have enough of snowflakes to fill the tree. I didn’t get the white Christmas I wanted but at least there were snowflakes in our living room. I really liked the simplicity of the Christmas tree with the white snowflakes and electric candles.  Now I’m wondering if should I stick with just the snowflakes or add something else as well? I have a few ideas floating around.

IMG_5159_3

I found the process of crocheting these snowflakes really therapeutic. As a technique I actually prefer crocheting to hand knitting because of the freedom it gives you. I found the patterns online, most of them from this website. I started out with this very informative and easy tutorial on Youtube, so I could get myself acquainted with the English crocheting vocabulary and follow the patterns. I used white cotton yarn and stiffened the snowflakes with a water and glue mix.

IMG_5140_3

Pattern in Finnish. 

IMG_5127_3

Bamboo snowflake pattern.

IMG_5169_3

Snowflake for Marikamum pattern.

IMG_5185_3

Crochet snowflake tutorial on Youtube.

IMG_5192_3

IMG_5194_3

Irish hearts snowflake pattern (on the right).