Natural dyeing: red onion skins on cotton

Dyeing with red onion skins blows my mind every time. How do these red skins turn in to yellow/green colours1? I have dyed wool yarn before with red onion skins and got an amazing strong colour. This time the colour was a bit lighter, but I think that really depends on the material. The lace I dyed turned out much stronger and this old sheet fabric that I have always gives lighter colours.

I mordanted my fabrics before hand with taro root powder and alum. You can read about it here. The dyeing process doesn’t differ from dyeing wool yarn or from dyeing with normal onion skins. I have written a good blog post about that here.

Natural Dyeing: Onion skins + shibori

IMG_5939_2

I have been saving up onion skins the whole spring and summer and finally I had enough to do an onion skin dye. Onion skins were one of the very first things I tried natural dyeing with. They are so easy and you get a very strong, lasting and vibrant colours. They don’t necessarily need an mordant and at least for me they work every time! And they are easy material to collect, very beginner friendly. I’m obsessed with mordanting so I mordanted my cotton with tara powder and alum, there is a post about it here. There is also an old post I wrote about dyeing wool yarn with onion skins here.

IMG_5751_2

The new thing I’m interested in is shibori dyeing. I really don’t know much about it so I’m still learning. I think for some of the things I did use a bit too thick fabric. I bought this old sheet from the flea market and that’s what I have been using for all of my dyeing experiments. I used a you tube tutorial from Blueprint to do these shibori folds. I had to improvise a bit though.

IMG_5754_2

Onion dyeing is very simple. You can pre soak the onion skins in cold water for anything from two hours to a day (or as long as you want). This time I skipped that step and just gently boiled the onion skins in my 10 litre pot for two hours and then filtered the skins away. I pre soaked the things I wanted to dye before adding them to the pot. Making sure they have enough room to move around in the pot.

I like to keep the temperature around 80-90 degrees celsius, it does not need to boil terribly. With wool yarns especially its good to keep an eye on the temperature as wool does not like to be boiled. Cotton of course is not so sensitive. After two hours I turn off the heath and let things cool down before I take them away from the dye. Then I rinse them with water until there is no more excess dye in the rinsing water.

IMG_5756_2

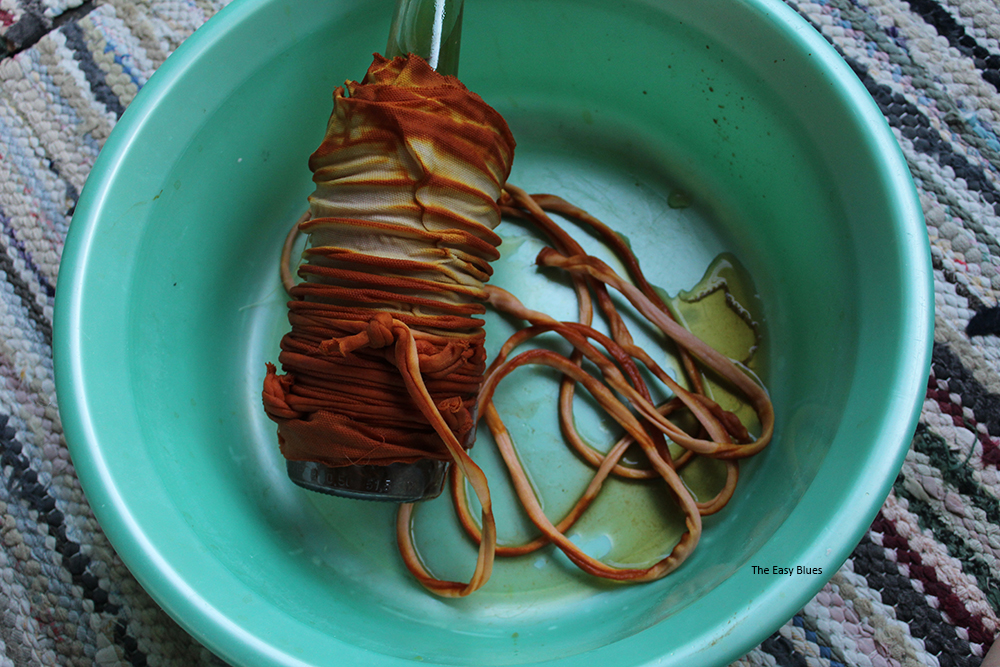
The first photo below is my second try with the bottle twisting shibori (I believe it’s called arashi-shibori?). I tried to do just one fold because with my first try (second photo) there were way too many folds and the dye just didn’t go through. I’m learning that with this kind of shibori thinner fabrics work better. The third one is the folded one where I used some chopsticks and the last one is the hand sewed one.

sipulishiborit

IMG_5766_2

The good thing about onion skin dye is that you can easily use the same dye bath multiple times. I usually always try to do at least two dyes with any natural dye. This time I did three and I probably could have done more.

shibori

I had to fill me bottle with water so it would not float in the dye bath. This bottle was also the only thing small enough to fit in to my dye bath. I think I got the shibori bug now and I need to try some more.

IMG_5793_2

Natural Dyeing: Red Onion Skins

January has been a very busy month for me and I haven’t had time to do anything creative. I’m hoping that things will change in February. I did have time for one experiment though. I did dye with normal onion skins last summer (read about it here) but I didn’t try red onion skins until now. I heard that the colour you get from them is green. I think mine turned out more brownish with a hint of yellow.

IMG_6491_2

You need a quite a lot of onion skins if you want to dye yarn with them. I don’t eat that much onions so I headed to a big supermarket. I know that they have these boxes underneath the onions where all the onion skins will drop. I asked from the saleswomen if I could get them for myself as they are going to the trash anyway. She was very helpful and I got three plastic bags full of normal onion skins and one with red onion skins. The cashier did give me a very curious look when I turned up with my treasures, I think I’m in danger of getting a bit of a crazy reputation.

IMG_6430_2

In the end I had 65 g of red onion skins that I put into a pot, added some water and let them soak for a day. Then I boiled the skins in the same water for two hours and forgot the skins for another day. Then I shifted the skins away and added some yarn.

IMG_6444_2

I used 50 g of 100% wool yarn that I had previously mordanted with alum and the cream of tartar. I kept the temperature under 80 °C. I think the colour is a bit olive. It’s weird because the yarn looks greenish in daylight, but brown in electric light, that’s natural dye for you.

IMG_6464_2

Into the same pot I threw in a tiny bit of unmordanted wool to see the difference. And that yarn is definitely more reddish brown colour.

IMG_6477_2

IMG_6479_2

I forgot the dye bath for couple of days and though that I try to dye some more yarn in it. This yarn was also premordanted with alum and the cream of tartar. I accidentally let the temperature get higher then with the previous one. Wool doesn’t really like temperatures that are too hot but the colour turned out stronger and browner then the first one. I think I could have tried to dye more but I ran out of yarn.

IMG_6488_2

Natural dyeing: Heather, Onion Skins and Birch Leaves

I took class on natural dyeing in the beginning of the summer and I though I share some of the things I dyed there. All of the plants I used for the colouring where collected in the beginning of June. Beginning of the summer is a great time for plant dyeing because the colours are more vibrant the earlier it is in the plants growing season (at least here in the north). The yarns I used where all 100% wool yarns and they were mordanted with alum. Read about mordanting here.

HEATHER

I used about 280 g of heather and dyed 108 g of wool yarn. First I soaked the heather in water over night. Then I boiled the heather in the same water for two hours. After that I dyed the yarn by boiling it in the sifted colour liquid for one hour.

IMG_2979_3

IMG_3188_2

ONION SKINS

For these yarns I used the liquid dye that was made out of onion skins. This was the third time that liquid was used. I added 3 g of madder powder and 1 g of cream of tartar to the liquid and I dyed 40 g of yarn. This really brightens the orange colour up. Check out my post for dyeing with onion skins here.

IMG_2981_2

IMG_1273_3

BIRCH LEAVES

I used 319 g of birch tree leaves and dyed 73 g of wool yarn. You do need a quite a lot of leaves for dyeing a lot of yarn. I boiled the leaves in water for two hours and then I dyed the yarn by boiling it in the sifted colour liquid for one hour. To get a bright green colour like this, it’s important to use early leaves from the beginning of the summer.

IMG_2988_2

IMG_2997_2

Natural Dyeing: Onion skins

I think onion skinss are amazing. It’s incredible how much colour they have in them. I used about 115 grams of onion skins to dye these yarns. I got the skins for free from my local supermarket. I might have gotten couple of strange looks while I was going through the onion box, collecting loose onion shells but it was definitely worth it.

I let the onion shells soak in water for one day before boiling them (in the same water) for two hours. For dyeing I used a variation of old wool yarns that I had mordanted earlier with alum. After shifting the dye bath I boiled the wool yarn in the dye bath for one hour (I kept the temperature at about 80 °C). After that I rinsed the yarn. Onion tends to release a lot of excess colour so it’s good to add some vinegar to the last rinsing water. I used wool yarns that I had previously mordanted with alum.

IMG_1273_3

IMG_1476_2

IMG_1319_3

IMG_1330_3

The first yarns on the left are from the first dyeing batch (88 g). I saved the dyeing liquid and dyed another batch of yarn in it(100 g). This batch is the yellow one in the middle. After that I used the colour liquid for the third time but added one teaspoon of madder powder and half a teaspoon of cream of tartar. These are the yarns on the right(77 g).

I think this is a good example of how different yarn qualities effect the dyeing result. I used both white and grey coloured yarns. With white yarn I got lighter oranges and yellows and with grey yarn stronger oranges and greens. I used ordinary onion shells but I also want to try red onion shells. I hear you can get a beautiful green from them. Has anybody tried red onion skins?

IMG_1503_2